Creating a Static Site Generator
Posted on Tuesday November 12, 2024

Content management systems, when done well, are a fantastic tool for a variety of roles out there. They can be vital for giving access to stakeholders, editors and creators who don't need to know the ins and outs of building a full website, but need to be able to create, update and publish on their own. The reason platforms such as Wordpress have taken off is through the ease of use and the flexibility they offer small time creators and developers in customising an off-the-shelf product to fit the needs of their clients. Wordpress, especially lately (October/November 2024) has been getting a lot of backlash, but the reality is that it powers most of the web for a very good reason.
What Wordpress is not, is light. The basic setup is relatively straight-forward to install and run, maybe not as much to secure, but once you start adding plugins, themes and customisations to your setup it can become very slow and unwieldy very quickly. All this can have an impact on how your website is perceived by users and search engines alike, and makes it harder to maintain and stay on top of. For those of us with a more detailed understanding of how to build and run software on the web, it's very unlikely to be the tool of choice if we have the time and inclination to care about these aspects.
THat's where static site generators can pick up the slack - they make it easy to publish content through simple templates such as markdown files, and compile all of this into a well-optimised static website that can easily be portably deployed anywhere that supports static content, without needing preprocessors such as PHP. There are a few off-the-shelf options such as Hugo or Next.js, or there is the option to tailor something to your own needs.
The blog you're reading this on right now is built using a static site generator after I decided that even the lightweight Python Flask setup that I had was completely unnecessary as there was nothing remotely dynamic about the content, especially when I was already building the articles in markdown. I wanted to stick with Python and the custom templates I was already using, so transformed my application into a generator and removed the Flask portion.
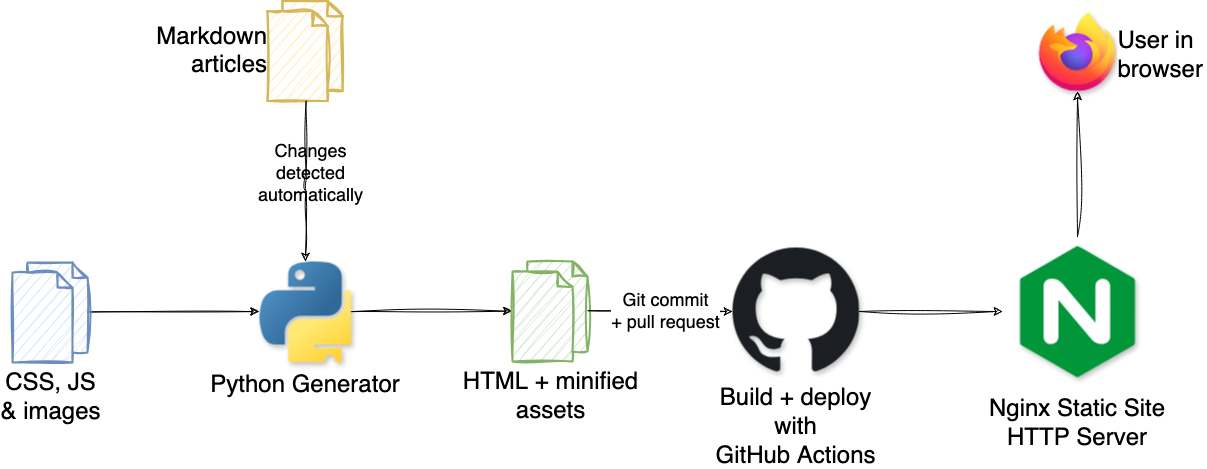
It's remarkably easy to build something in Python that takes a set of Markdown files and produces a very simple blog in HTML and CSS that you can build using a CI/CD tool such as GitHub Actions, and then deploy anywhere that serves static content such as either AWS S3 or any Nginx installation. There's even an efficient way to test and build this locally using a containerised Nginx that can share a similar config file to your server destination.
Templates
The articles for the blog are available on GitHub and all follow the same markdown template:
# Blog Title

## Introduction content that's published on the front page
More content here...
### Including headings
And more...
The idea is to translate these into individual articles and to build out a paginated index page that shows the introduction content and images. This will need to include any search engine relevant information and static assets such as a sitemap, and have the option for additional content pages such as the Now page.
Scripting
Within the blog's source code, there are two main Python scripts responsible: articles.py and generate.py.
articles.py contains all the logic for discovering and interacting with the markdown files within the articles folder, using the markdown library to parse and convert this, along with copious amounts of regex to extract the title, summary and banner image.
generate.py uses the articles and Jinja2 templating library to compile the articles and static pages into their generated HTML.
Alongside the Python scripts, the CSS is compiled from SCSS using Gulp within the assets folder.
Creating a new file in the articles/ folder is enough for the script to pick it up and, provided it's in the correct format and with the correct date string, add it into the index and sitemap.
Development Workflow
To generate the output each time, you can just run python3 -m blog.generate and then open the output folder, but this doesn't give you the full experience of how this would appear in the production server, or automatically update when you change any of the files.
Using a combination of Docker for Nginx and a Python watch script makes this a lot easier.
An nginx.conf file configures it to work in the same way as it would on the destination server, ensuring it serves the pages and index correctly. This is launched in Docker with Nginx:
docker run --rm -d -v $(pwd)/docker/nginx.conf:/etc/nginx/nginx.conf:ro -v $(pwd)/dist:/usr/share/nginx/html -p 8080:80 nginx
And then, to watch for any changes in either the articles or the source code, a Python script sits open in the terminal:
when-changed -r -1 articles blog -c python3 -m blog.generate
There are definitely some improvements to be made here - I would prefer to have the frontend asset generation coupled into this process too, and move the page generation over to using markdown rather than the HTML files that are in place now, but it serves a purpose as it stands.
Building a Release
A GitHub Action is used to build the release simply by triggering the Python generate script on the source code and then uploading the resulting dist/ folder as a release into GitHub. It also calculates the next semantic version and inserts this into the configuration file before completing the upload.
Deploying
Once the release is complete, deploying is an upload onto an Nginx server which hosts the blog at present. In the past there was a separate script that uploaded this to AWS S3 buckets and configured a blue/green approach to ensure no downtime.