Moving from Terraform to CDK
Posted on Friday August 30, 2024
Both Terraform and AWS CDK allow you to define and manage your infrastructure through code (IaC) - rather than using a web console or UI to spin up your virtual machines and associated configuration, you define it through code which allows it to be re-run, extended and predictable, making it easy to build and recover when something goes wrong, or to extend and spin out your infrastructure into multiple environments or accounts. However, how Terraform and CDK look at this is slightly different.
Terraform has been around for a while now. It's been the technology of choice for infrastructure engineers who want to define their setup through code and also may want to avoid looking themselves fully into a particular vendor (although this is a little bit of a fallacy - there's no way to migrate from one vendor to another in Terraform without fundamentally rewriting your entire setup to use different resources). It manages state either locally or remotely, supporting pushing state into object storage such as AWS S3.
Terraform uses providers that connect to various infrastructure APIs to liaise and manage their state and resources and data sources, interacting to create, read, update and delete those appropriately from the changes in the definition it calculates. As such, you're able to manage infrastructure in multiple providers from the same definitions. There are providers for all the major cloud providers (AWS, GCP and Azure), all the way down to smaller hosts such as DigitalOcean. You can manage Kubernetes resources, connect to any HTTP API and build your own in you so desire.
AWS has had it's CloudFormation stacks and definitions in place for a while, since the very early days of AWS, and CDK is comparatively quite new, only coming out in the last few years and gaining traction relatively recently. It builds onto those early foundations and is obviously AWS-specific, tying very closely into the AWS APIs to create and manage infrastructure within the platform, using existing IAM authentication. Stacks are used to build your infrastructure, splitting into constructs to provide logical separation for groups of definitions. The CDK code is then compiled into CloudFormation templates to apply and manage the infrastructure directly using the existing technology.
Differences
So what are the major differences between Terraform and AWS CDK?
State:
Terraform stores state differently depending on the remote platform, and has a variety of options available. Using the AWS provider gives you the option of using a local state (stored in a "tfstate" file) or a remote one that is stored within S3, using DynamoDB to track when a state is "locked" for updates.
AWS CDK is built on top of CloudFormation, and uses Stacks to manage and calculate the differences in state natively within AWS.
Both tools generate the differences that will be applied/deployed and produce a file that can then be used to reliably run those changes: for Terraform this is a plan file, and for CDK, the "synth" command produces an "out" file.
Language:
Terraform is written in Hashicorp Configuration Language (HCL), a purpose-designed Go-like template language that has grown over recent iterations to include more logical features and deterministic support to build a variable stack of infrastructure that can be calculated, but it can still be a little restrictive.
AWS CDK uses existing languages. It was originally released to support TypeScript and Python, and has grown to include Java, Golang and C# recently. The intention is to allow developers to er-use the language and tooling that they're already familiar with. This also provides some opportunities to include additional logic, libraries and abstractions that are not as easy to compile for Terraform.
Abstraction:
Terraform is a declarative tool, and requires each resource to be created to be explicitly defined within the code. CDK is imperative, and can identify the resources needed in a more simple manner. One example is how CDK simplifies the logic for adding permissions to an S3 bucket, for example. It provides and API onto the bucket object itself where you can pass one or more IAM roles and update both the permissions within the IAM role, and the permissions on the bucket policy automatically.
Importing:
Ideally, you wouldn't be in a situation where you need to import resources into a stateful setup, but I've been in a few situations like this myself. Terraform now allows you to define imports within the code as well as using the terraform import command. You can, of course, refer to existing infrastructure using data sources where they are not brought into your state. CDK is not as simple, and although you can refer to existing resources within your CDK scripts, you can not import them into your stack.
Conclusion:
You can make up your own mind which tool you think is going to be better for your needs. If you're starting from scratch and will be using AWS exclusively, then AWS CDK is a great tool of choice. In other scenarios, Terraform would probably be a better fit.
Example - Deploying Journal
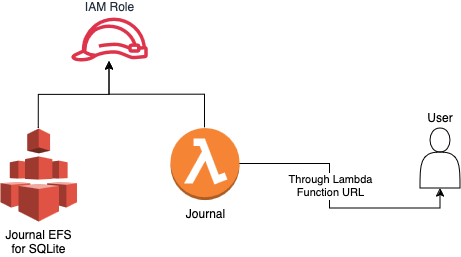
The best way to demonstrate CDK is to build something. I've been working on a Journal-like application for a while, and use it to publish my thoughts on a private setup - the code itself is public, written in Go and easily deployable into a Lambda as long as you have an EFS to support the SQLite database it uses behind the scenes, so that's what we're going to build, using the Typescript CDK.
This assumes you have the following available:
- An AWS account
- A set of AWS credentials available locally to build the stack and to run CDK easily
As long as you have Node.js available locally you should be able to use npx to setup CDK for your project:
mkdir journal-infra
cd journal-infra
npx aws-cdk init --language typescript
You'll be provided with the following set of files:
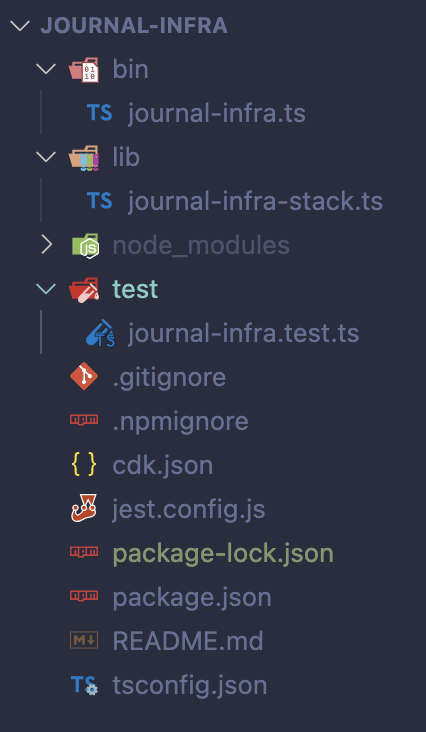
The only file we'll be changing is lib/journal-infra-stack.ts which should now look like the following:
import * as cdk from 'aws-cdk-lib';
import { Peer, Port, SecurityGroup, Vpc } from 'aws-cdk-lib/aws-ec2';
import { FileSystem, PerformanceMode, ThroughputMode } from 'aws-cdk-lib/aws-efs';
import { Effect, PolicyStatement, Role, ServicePrincipal } from 'aws-cdk-lib/aws-iam';
import { Code, Function, FunctionUrlAuthType, FileSystem as LambdaFileSystem, Runtime } from 'aws-cdk-lib/aws-lambda';
import { Construct } from 'constructs';
import { join } from 'path';

export class JournalInfraStack extends cdk.Stack {
  constructor(scope: Construct, id: string, props?: cdk.StackProps) {
    super(scope, id, props);

    const defaultVpc = Vpc.fromLookup(this, 'DefaultVPC', {
      isDefault: true,
    });

    const sg = new SecurityGroup(this, 'JournalSG', {
      vpc: defaultVpc,
      allowAllOutbound: true,
    });
    sg.addIngressRule(Peer.anyIpv4(), Port.tcp(443));

    const role = new Role(this, 'JournalRole', {
      assumedBy: new ServicePrincipal('lambda.amazonaws.com'),
    });
    role.addToPolicy(new PolicyStatement({
      effect: Effect.ALLOW,
      resources: [`arn:aws:logs:*:${this.account}:*`],
      actions: ['logs:CreateLogGroup'],
    }));
    role.addToPolicy(new PolicyStatement({
      effect: Effect.ALLOW,
      resources: [`arn:aws:logs:*:${this.account}:log-group:*:*`],
      actions: ['logs:CreateLogStream', 'logs:PutLogEvents'],
    }));
    role.addToPolicy(new PolicyStatement({
      effect: Effect.ALLOW,
      resources: ['*'],
      actions: ['ec2:DescribeNetworkInterfaces', 'ec2:CreateNetworkInterface', 'ec2:DeleteNetworkInterface', 'ec2:DescribeInstances', 'ec2:AttachNetworkInterface'],
    }));

    const efs = new FileSystem(this, 'JournalEFS', {
      vpc: defaultVpc,
      performanceMode: PerformanceMode.GENERAL_PURPOSE,
      throughputMode: ThroughputMode.ELASTIC,
    });
    const accessPoint = efs.addAccessPoint('JournalEFSAccessPoint', {
      createAcl: {
        ownerGid: '1001',
        ownerUid: '1001',
        permissions: '777'
      },
      path: '/db',
      posixUser: {
        gid: '1001',
        uid: '1001'
      },
    });
    role.addToPolicy(new PolicyStatement({
      effect: Effect.ALLOW,
      resources: [efs.fileSystemArn, accessPoint.accessPointArn],
      actions: ['elasticfilesystem:ClientMount', 'elasticfilesystem:ClientRootAccess', 'elasticfilesystem:ClientWrite', 'elasticfilesystem:DescribeMountTargets'],
    }));

    const lambda = new Function(this, 'JournalLambda', {
      role,
      runtime: Runtime.PROVIDED_AL2023,
      code: Code.fromAsset(join(__dirname, '../dist')),
      handler: 'bootstrap',
      vpc: defaultVpc,
      filesystem: LambdaFileSystem.fromEfsAccessPoint(accessPoint, '/mnt/db'),
      environment: {
        J_DB_PATH: '/mnt/db/journal.db',
      },
      securityGroups: [sg],
      allowPublicSubnet: true,
    });
    efs.connections.allowFrom(lambda, Port.allTcp());

    const url = lambda.addFunctionUrl({
      authType: FunctionUrlAuthType.NONE,
    });
    new cdk.CfnOutput(this, 'LambdaURL', {
      value: url.url,
    });
  }
}
lines 13-15: Each AWS account has a default VPC, here we're using it to deploy the EFS and Lambda into. The CDK stack won't control this infrastructure, but we can reference it this way
lines 17-21: A security group is needed to control access to the Lambda function, for the purposes of our Journal application only port 443 (HTTPS) is required
lines 23-40: The IAM role that the Lambda function will execute as requires permission to create logs in CloudWatch, access the EFS and mount itself within the VPC
lines 42-63: The EFS requires some configuration, and needs to be attached to the VPC. The default user and group ensure it works correctly with the Lambda function when it runs
lines 65-78: The Lambda function requires the Amazon Linux flavour as it runs Go as a binary only, with all the libraries it needs packaged inside. The filesystem and environment is configured here too, and it opens EFS connections once the function is available
lines 80-85: Finally, the Lambda function needs a URL for access, this creates a function URL and then outputs it once the stack is deployed
You'll also need to make a small change to bin/journal-infra.ts by uncommenting the following line:
env: { account: process.env.CDK_DEFAULT_ACCOUNT, region: process.env.CDK_DEFAULT_REGION },
There are a few caveats with this simple solution:
- The permissions are a little lax for simplicity, and could be tightened to specific VPCs and CloudWatch groups, but for demonstration purposes these will suffice
- Everything is taking place within the public subnets, which means using public IPv4 addresses which can be a security risk if not correctly controlled
- The resources are all created within the main stack file - these could be split into separate constructs and aspects to make the infrastructure a little more portable
Building and Deploying
Firstly, you'll need to ensure your AWS CLI has been setup correctly to access your account. You can do this by running aws configure and ensuring you enter your AWS credentials along with your chosen region.
Before starting to deploy, you'll need to grab the latest release from the Journal GitHub page, downloading the Lambda ZIP, and then unzip it into a new folder dist within your journal-infra folder - it should contain an executable bootstrap and web folder that contains static assets.
To deploy the CDK stack, there are two commands that need to be run:
npx cdk bootstrap
npx cdk deploy
The first command bootstraps the region in your account for use with CDK, setting up the needed stateful stores within CloudFormation, and is only needed to run the first time. Secondly, deploy generates the CloudFormation required and actions the infrastructure changes within your AWS account. Running this will show you what the command will change, along with showing you a progress report as it runs through.
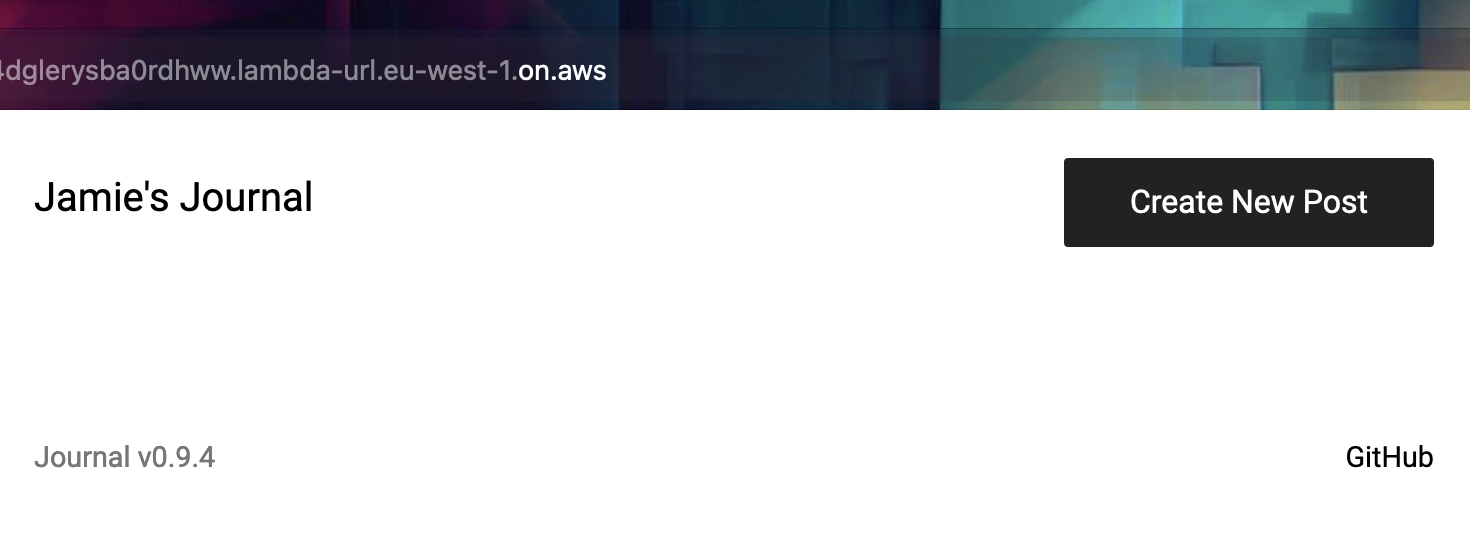
Once complete, you should receive some output similar to the following, although your URL will be different:

Head there, and you should see an empty Journal installation:
Adding a Certificate and ALB
Rather than using a function URL, you can use an Application Load Balancer (ALB) and Amazon Certificate, together with a Route 53 managed domain, to provide a secured custom URL. For this purpose, we'll assume the Route 53 record is in place, and simply add to it.
To make these changes, remove liens 80-85 to remove the function URL and add the following:
    const zone = HostedZone.fromLookup(this, 'JournalHostedZone', {
      domainName: 'jamiehurst.co.uk',
    });

    const cert = new Certificate(this, 'JournalCert', {
      domainName: 'journal-lambda.jamiehurst.co.uk',
      validation: CertificateValidation.fromDns(zone),
    });

    const alb = new ApplicationLoadBalancer(this, 'JournalALB', {
      vpc: defaultVpc,
      internetFacing: true,
    });
    alb.addRedirect();

    const listener = alb.addListener('JournalHTTPSListener', {
      port: 443,
      certificates: [cert],
    });

    const target = listener.addTargets('JournalHTTPSListenerTargets', {
      targets: [new LambdaTarget(lambda)],
      healthCheck: {
        enabled: true
      },
    });
    target.setAttribute('lambda.multi_value_headers.enabled', 'true');

    new ARecord(this, 'JournalDNSRecord', {
      zone,
      recordName: 'journal-lambda',
      target: RecordTarget.fromAlias(new LoadBalancerTarget(alb)),
    });
lines 85-87: The existing hosted zone will be required to use within the certificate, and within the new A record creation - change this to your own entry
lines 89-92: This creates the Amazon-managed certificate and sets it to validate and manage this automatically within Route 53
lines 94-98: Creates the ALB within the same VPC, makes it internet-facing so it is publicly addressable, and sets up a default port 80 - 443 redirect
lines 100-103: Adds the listener for HTTPS, attaching the certificate to it
lines 105-111: Adds the Lambda target to the ALB and listener, enabling health checks and making sure the Lambda multi-value header support is enabled as this is required
lines 113-117: Finally, create the new A record within the existing hosted zone (in this case, for journal-lambda.jamiehurst.co.uk) and attach this to the load balancer
Take care to update this example to use your own domain that is available within the account.
Once again, this can be deployed and it will make the incremental changes needed:
npx cdk deploy
In the above example, the Journal is now available at journal0-lambda.jamiehurst.co.uk.
Once you've finished playing around, you can terminate everything that was created with the following command:
npx cdk destroy
It should go without saying, but please be careful using this in real environments!
The full example is available in a GitHub gist.